
STMicroelectronics has adopted TrueSTUDIO from the former Atollic as its free development environment.
TrueSTUDIO is based on Eclipse, it is mature and stable. We continue to use it despite the availability of STM32cubeIDE which is heavier (it takes twice as long to compile and start debugging).
Here are some tips to configure Eclipse based IDE as TrueSTUDIO or STM32cubeIDE.
To migrate a project from TrueSTUDIO to STM32CubeIDE see this document. More explanation below…
How to update TrueSTUDIO
TrueSTUDIO is declared obsolete by STM, which replaced it by STM32CubeIDE. But the latter is heavy and slow.
For those who use TrueSTUDIO it is a pain to have to part with it because we can’t flash and debug some MCUs appeared after the release of TrueSTUDIO 9.3, such as G491 or H723. However there are some ways to extend its life:
- Upgrade the svd files. These CMSIS files describes the MCU registers and bits. If you want to debug the newer MCUs and use the SFR view, or use updated svd files that correct errors, you can update the svd files in TrueSTUDIO.
- To flash and debug the newer MCU you must use an up-to-date programmer: Update STM32_Programmer_CLI.exe.
- Update the GCC toolchain and the GDB server.
This post explains how to update TrueSTUDIO with STM32CubeIDE 1.9 components. It is therefore necessary to have STM32CubeIDE 1.9 installed before starting the update.
Update the svd files
All the svd files are in one folder (for mono core MCUs).
In the STM32CubeIDE folder search for “CMSIS_SVD”. The result is 2 folders: one for the MCUs and the other for the MPUs. Go to the MCUs folder (contain files like STM32F411.svd) and copy its content.
In the Atollic folder search for the folder “sfr”:
C:\Program Files (x86)\Atollic\TrueSTUDIO for STM32 9.3.0\ide\plugins\com.atollic.truestudio.tsp.stm32_1.0.0.20190212-0734\tsp\sfr
Then paste the svd files in this folder. The svd files are updated.
If you don’t want to overwrite the original files, create a new folder e.g.:
C:\Program Files (x86)\Atollic\TrueSTUDIO for STM32 9.3.0\svd
and paste the svd files in this folder.
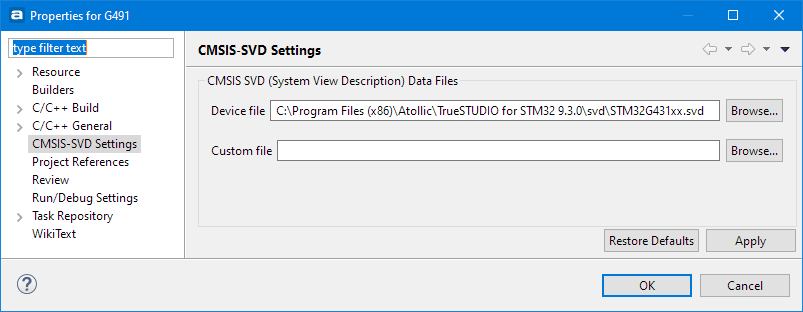
Then in the project properties you can choose the proper svd file:
Update the programmer
The native STM32_Programmer_CLI.exe version of TrueSTUDIO is 1.3. I successfully used STM32_Programmer_CLI version 2.10 of STM32CubeIDE 1.9.
Locate the Atollic programmer folder:
C:\Program Files (x86)\Atollic\TrueSTUDIO for STM32 9.3.0\Servers\STM32CubeProgrammer
Rename it for backup: STM32CubeProgrammer.1.3
Locate the STM32CubeIDE programmer folder:
C:\ST\STM32CubeIDE_1.9.0\STM32CubeIDE\plugins\com.st.stm32cube.ide.mcu.externaltools.cubeprogrammer.win32_2.0.200.202202231230\tools
Copy this “tools” folder in the TrueSTUDIO “Servers” folder. Rename “tools” to “STM32CubeProgrammer”
That’s all. Now you can program the newest STM32 MCUs.
Update ST-LINK-gdbserver to 6.1.0
Copy the server folder
Copy:
C:\ST\STM32CubeIDE_1.9.0\STM32CubeIDE\plugins\com.st.stm32cube.ide.mcu.externaltools.stlink-gdb-server.win32_2.0.200.202202231230\tools\bin
To:
C:\Program Files (x86)\Atollic\TrueSTUDIO for STM32 9.3.0\Servers
Rename: bin
To ST-LINK_gdbserver-1.6
Tell TrueSTUDIO to use this new GDB server:
In TrueSTUDIO menu: Windows / Preferences
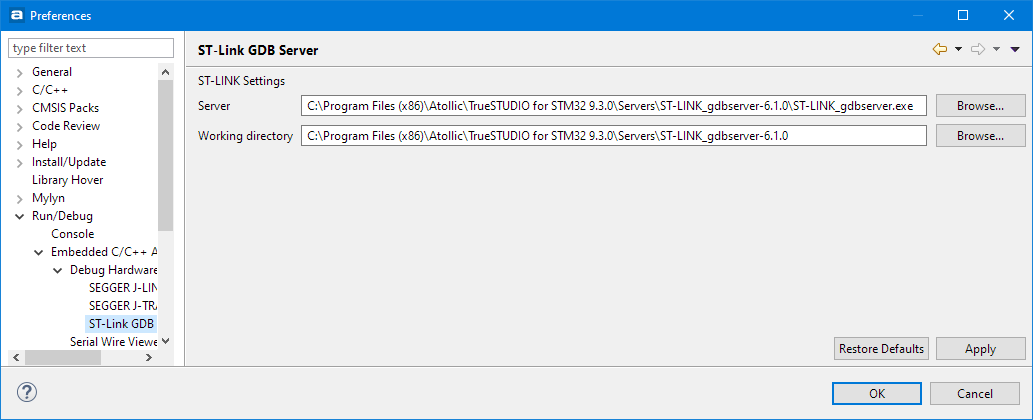
Run/Debug > Embedded C/C++ Application > Debug hardware > ST-Link GDB Server
Select the path to the new GDB Server exe and the working directory.
In this window you can choose the native GDB server or the one just added.
Update the toolchain
The native GCC version of TrueSTUDIO is 6.3.1 20170215. To date the latest version is 10.3.1. Luckily TrueSTUDIO allows you to choose from several toolchains. Here’s how to install it for Windows platforms.
Copy the file
- Create : C:\Program Files (x86)\Atollic\TrueSTUDIO for STM32 9.3.0\gcc-10.3.1
- Copy the content of CubeIDE folder: C:\ST\STM32CubeIDE_1.9.0\STM32CubeIDE\plugins\com.st.stm32cube.ide.mcu.externaltools.gnu-tools-for-stm32.10.3-2021.10.win32_1.0.0.202111181127\tools
- To: C:\Program Files (x86)\Atollic\TrueSTUDIO for STM32 9.3.0\gcc-10.3.1
Rename the files
The tools have a standard name like “arm-none-eabi-cpp.exe”, but TrueSTUDIO uses names like “arm-atollic-eabi-cpp.exe”.
It is possible to set the new names of every tools in the tool settings of every project. This is tedious. It’s easier to change the name of the tools:
- Start a PowerShell as administrator: right clic on Start, select “Windows PowerShell (admin)”
- Go to the directory “gcc-10.3.1\bin”
- Use the command: Dir | Rename-Item -NewName { $_.name -replace “none”,”atollic” }
Copy GDB server
The GDB server is specific to TrueSTUDIO and the one provided in the new toolchain does not work. It is therefore necessary to copy the original GDB server into the new toolchain:
Copy:
C:\Program Files (x86)\Atollic\TrueSTUDIO for STM32 9.3.0\ARMTools\bin\arm-atollic-eabi-gdb.exe
To:
C:/Program Files (x86)/Atollic/TrueSTUDIO for STM32 9.3.0/gcc-10.3.1/bin
Select the toolchain for the project
In the project properties select the tab “C/C ++ Build > Settings > Toolchain Version” (or the icon with a hammer and a square text).
- Check the “Fixed toolchain location” radio button
- Browse to your new binary tool chain, like C:/Program Files (x86)/Atollic/TrueSTUDIO for STM32 9.3.0/gcc-10.3.1/bin
That’s all! In less than half an hour.
Now you have the latest GCC toolchain, and a simple radio button allows you to select the default TrueSTUDIO toolchain or the new one (it may be useful to easily revert to the original version).
Known limitations
- When you connect a new development board, the GDB server may ask to update the ST-LINK of the board.
This cannot be done from TrueSTUDIO, you have to use STM32CubeProgrammer.
I didn’t search much because it’s easy to do with STM32CubeProgrammer. - Nothing done for multi core MCUs.
- Nothing done for Segger probes.
Conclusion
The upgrade is fine for me. TrueSTUDIO and CubeIDE are still quite compatible.
I tested projects on F411, F446, G071, G431, L4R5, G491, H743 and H723:
Compile, flash, debug with breakpoints and SWV.
How to create a new workspace
The first thing to do is to create a Workspace to host the projects.
For STM32CubeIDE
In the folder that should contain the Workspace, create a new folder with the name of the Workspace.
Then start STM32CubeIDE. In the first screen select the newly created folder.
That’s all.
For TrueSTUDIO
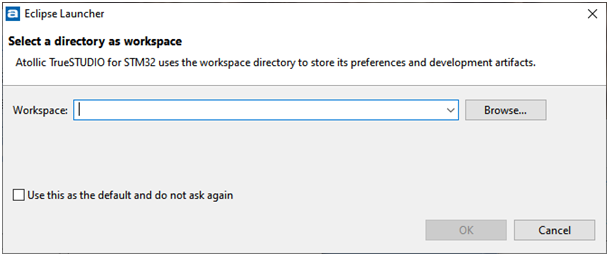
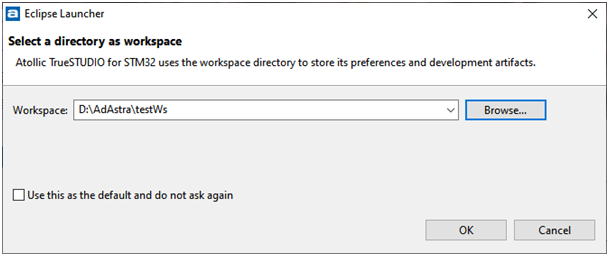
Start TrueSTUDIO. The first screen allows to create a workspace:
Click the “Browse…” button.
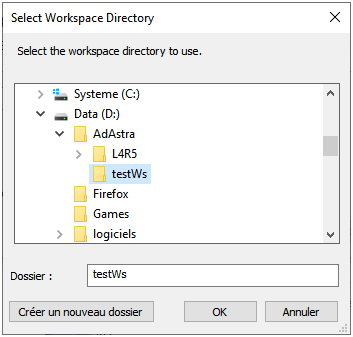
Navigate to the target folder, where the workspace folder will be created.
Click “Create a new folder”, then give the name of the new workspace.
Be sure to have the workspace folder name in the “Folder” field, then click OK.
Click OK in the Eclipse Launcher, and the new empty workspace is created:
How to import an existing project in a workspace
For STM32CubeIDE
To migrate a project from TrueSTUDIO to STM32CubeIDE first see this document.
Here is a more complete explanation.
- Copy (not move!) the project folder into the STM32CubeIDE workspace folder.
- Delete the “Debug” folder of the project.
- Delete launch configurations.
- Launch STM32CubeIDE, and select the workspace.
- In the workspace menu “File” then “Import…” then “Import Atollic TrueSTUDIO project”.
- Answer to the questions. It will repeatedly ask you to choose the MCU used in the project.
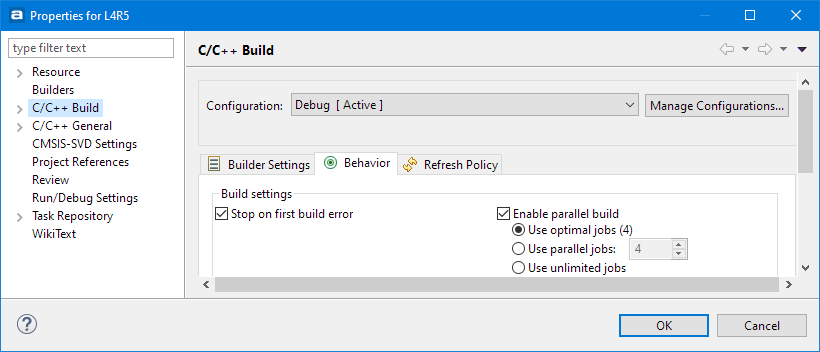
- In the “Project Explorer” right click the project name then “Properties”:
- C/C++ Builds / Behaviour tab.
- Check “Enable parallel Build” and “Use optimal jobs”.
- Build the project.
On the migration process the debug and run configurations are forgotten. We have to recreate them after building the project. To create the debug configuration the simplest way is:
In the “Project Explorer” right clic the project name / Debug as… / STM32 Cortex-M C/C++ Application
On the first use this will open a preconfigured debug configuration.
The other way to create a debug configuration:
- In the “Project Explorer” select the project.
- In the workspace menu “Run” then “Debug Configurations…”.
- Right click “STM32 Cortex-M C/C++ Application” and select “New Configuration”.
- In the Main tab : Give a name: “xxx Debug”.
- In the Debugger tab: Setect your debug probe (if not automatically detected).
- In the Startup tab: Uncheck “Set breakpoint at:” (if there is no main in the project).
- In tab Common: check “Shared file:” and in Display in favorite menu check “Debug”.
- Apply / Close.
To create the run configuration, it’s almost the same thing:
- In the “Project Explorer” select the project.
- In the workspace menu “Run” then “Run Configurations…“.
- Right click “STM32 Cortex-M C/C++ Application” and select “New Configuration”.
- In the Main tab : Give a name: “xxx Run“.
- In the Debugger tab: Setect your debug probe (if not automatically detected).
- In the Startup tab: the “Set breakpoint at:” is grayed.
- In tab Common: check “Shared file:” and in Display in favorite menu check “Run“.
- Apply / Close.
For TrueSTUDIO
Start TrueSTUDIO with the target workspace.
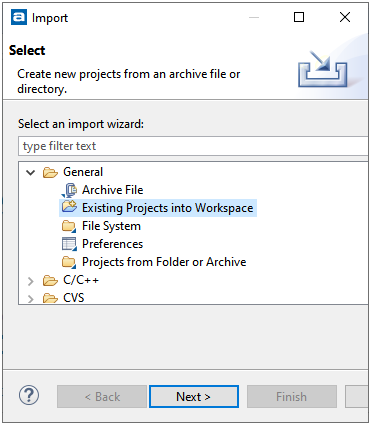
Select the File menu then “Import…”
Under “General” select “Existing Projects into Workspace”, then “Next”.
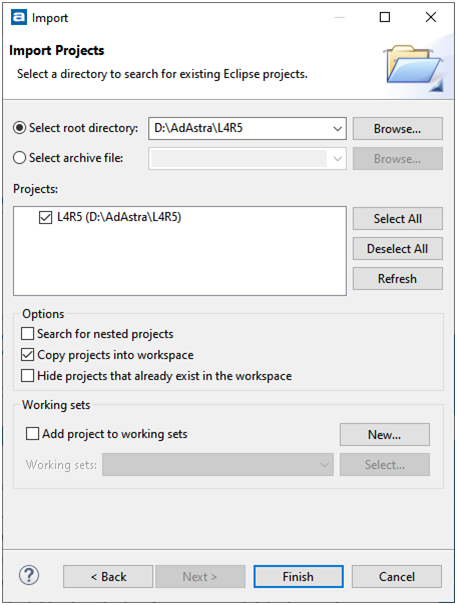
Click the “Browsee…” button and select the old project directory you would like to import.
Check “Copy project into workspace”
Then click “Finish”.
Your project is ready to compile and download:
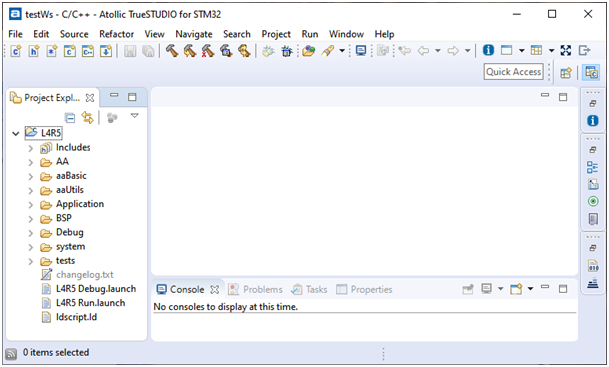
You can delete the old project folder because the project has been copied to the workspace.
Enable multi core build
To benefit from an accelerated compilation it may be necessary to validate the use of several processor cores.
- Right click on the project name, then “Properties”.
- Select the “C/C++ Build / Behaviour” tab
- Check “Enable parallel build” and “Use optimal jobs”.
File search dialog
The file search should be the most used search. There are two tips to facilitate this search.
First: set the file search tab as default.
The search dialog has several tabs. It would be useful if the “Search for files” tab was selected by default.
- In the menu “Search” select “Search…”. Select the “File search” tab.
- Click the “Customize” button at the bottom of the window.
- Then check “Remember last used page”.
Second: set a shortcut to open the file search dialog.
The shortcut to open the search dialog is CTRL+H. If it is not configured:
- In the menu “Window” select “Preference / General / Keys”.
- Type the filter text “search” and find the “Open search dialog” command. Click it.
- Clear the binding field and stroke CTRL and H.
- Click Apply/OK.
Build selected file(s)
Sometimes it is very useful to build only a selected file or a set of few selected files:
- Select the file(s) you want to buid (with CTRL for more than one file)
- Right click on one file you want to build
- Click on “Build Selected File(s)”.
The menus to build or clean selected files is only available if “Build automatically” is not enabled:
To enable these commands:
- Menu “Project”:
- Uncheck “Build Automatically”.
On some other IDE as TrueSTUDIO:
- Menu “Windows” select “Preference / General / Workspace”
- Uncheck “Build automatically”.
Download to MCU target without debug
Sometimes it is useful to flash the application in the target without launching the debugger. To do this, a special “Run configuration” must be created.
STM32CubeIDE
Build a “Run Configuration” as explained here.
TrueSTUDIO
The difference between Run and Debug configurations is only the script content:
- In the Project Explorer select your project.
- In the menu Run select “Debug Configuration…”
- Right click “Embedded C/C++ Application” and select “New”
- Give it a name, example “L4R5 Run”
- In “C++ Application” select “Browse..” and select your application .elf file in the Debug folder. Then remove the absolute path and leave only “Debug\project_name.elf”.
- In the “Debugger” tab select your debugger probe.
- In the “Startup Script” tab, replace the end of the script with “quit”
- In the “Common” tab, select “Shared file”, and check “Debug” under “Display in favorites menu”.
The run script looks like:
# Set flash parallelism mode to 32, 16, or 8 bit when using STM32 F2/F4 microcontrollers
# Uncomment next line, 2=32 bit, 1=16 bit and 0=8 bit parallelism mode
#monitor flash set_parallelism_mode 2

# Set character encoding
set host-charset CP1252
set target-charset CP1252

# Reset to known state
monitor reset

# Load the program executable
load

# Reset the chip to get to a known state. Remove "monitor reset" command
#  if the code is not located at default address and does not run by reset.
monitor reset

quit
If you already have a working debug configuration, there is a simpler procedure:
- In the Project Explorer select your project.
- In the menu Run select “Debug Configuration…”
- Right click your configuration and select Duplicate
- Modify the name, example “L4R5 Run”
- In the “Startup Script” tab, modify the scrip.
Customize the current perspective to launch your debug / run configurations:
- In the menu “Windows” select “Perspective / Customize Perspective”
- In the “Tool Bar Visibility” tab expand the “Launch” item.
- Uncheck and check again the “Debug” subitem.
Now in the toolbar you should have a “Debug”button with a drop-down list to select the desired debug configurations.
Thanks to: https://calinradoni.blogspot.com/2016/09/atollic-truestudio-download-without.html for this tip.
Hi! Thanks for this great tutorial!
I’ve followed the steps (except “update the toolchain” one) with the latest CubeIDE version (1.15.1), but looks like is not working anymore. When I try to debug the H743 MCU, I’m getting a “Failed to get device information” error and the launch process is terminated…
This post concerns the use of STM32CubeIDE 1.9 which happens to be largely compatible with TrueSTUDIO.
I don’t know if STM32CubeIDE 1.15 is still compatible.
Your problem looks like an incompatibility with the GDB server.